Joy Control
Joy Control – precise gamepad control for simulators
⬇ JoyControl.rar (15 MB) ⬇ JoyControl-EN.pdf (720 KB)ENGI Live JoyControl is a Windows program that acts as an intermediary between your controller and the game. It reads input from DualShock 4, DualSense, Xbox (XInput) controllers, steering wheels, joysticks (HID/DirectInput), and keyboards. The program processes the input signal and sends it to the game as a virtual Xbox 360 gamepad via the ViGEmBus driver.
The program is invisible to the game. The game sees a standard, regular controller, so the settings work in any simulator. No mods are required, and there's no need for developer support, as the game files are not modified.
The core idea of the program is simple. The trigger on a gamepad has a travel distance of about 2 cm, while the accelerator pedal in a car has a travel distance of about 10 cm. The joystick deflects by 1.5 cm, and the steering wheel rotates by half a revolution. This is precisely why it's so difficult to precisely control the throttle and brakes on a gamepad: the finger travels the entire range from 0 to 100% in 50-80 milliseconds, causing the car to either spin out of control or lock up the wheels. Joy Control restores the proper travel distance to the controls. The program achieves this not through visual representations, but through actual timing and response curves.
How signal processing works:
Each value goes through a processing pipeline, and the output is a customized controller:
- Dead Zone. The program sets all raw values below the threshold to zero, which means that jitter and wear and tear are not reflected in the gameplay.
- Trigger interaction. One trigger is subtracted from another, multiplied by a factor.
- Sensitivity curve. It defines the shape of the response: a gradual start or a sharp one.
- Threshold and output limit. Any value below "Min" is set to zero, while the remaining range is stretched to the full available range; "Max" limits the output from above.
- Smoothing segments. These define the rate of change in milliseconds per unit, separately for the press and release actions.
- Macros and Action Mappings. One control element affects another.
- Virtual Xbox 360 gamepad. The processed input is sent directly to the game.
The controller is polled at a frequency of approximately 120-125 Hz. All delays are calculated using a high-precision timer with time accumulation, so a step of 0.1 milliseconds per unit is processed correctly even between polling frames.
Features of the program:
- Supports any input devices. PS4 and PS5 consoles are automatically recognized. Xbox controllers connect via XInput. Steering wheels and joysticks work with HID and DirectInput. A keyboard can be used as a substitute for a gamepad. You can connect as many joysticks as you like: each one has a unique ID and its own settings, so even two identical gamepads can be configured separately.
- Independent trigger adjustment. The brake and accelerator are adjusted separately, not with a single slider controlling both.
- Up to 10 smoothing segments. These segments are defined within a range of 0 to 255, separately for the "pressed" state and the "released" state, and the delay for each segment ranges from 0.1 to 1000 milliseconds per unit.
- Sensitivity Curves. For the triggers, the sensitivity curve can be adjusted from -20 to +20. For each axis of the analog sticks, the sensitivity curve can be adjusted from -10 to +10.
- Full stick configuration. This allows you to adjust the internal and external dead zones, limit the range of movement along the X and Y axes, set the full travel range, and enforce a maximum value for the axis.
- Macros. The modes "Follow," "Hold," "Impulse," "Toggle," "Turbo," "Off," and "Sequence" are available. "Sequence" allows for a chain of up to 16 steps with customizable timing. Each rule can have up to four conditions: buttons, triggers, and analog sticks with defined ranges, so a combination like "L1 pressed and L2 partially depressed" can be defined by a single rule. Features include reverse functionality, priority settings, delays in microseconds, and combination methods—"Larger of the two," replacement, or addition—including combinations with other macros. Linking allows the result of one rule to trigger another.
- Action mappings. Any input can be linked to any output, and you can specify a trigger threshold, a hold requirement, and delays before and after the action.
- Real-time oscilloscope. The graph shows the raw data from the controller in gray for the last 3 seconds, while the colored line represents the data being sent to the game. This allows for clear visualization and eliminates guesswork during setup.
- Interactive image of a gamepad. Clicking on a trigger, stick, button, or touchpad opens a window with its settings.
- Profiles. The settings are stored in a local SQLite database. Each profile has a unique 16-digit code, and data exchange with files is done using the JSON format. It's convenient to create a separate profile for each game. The settings for each joystick are saved in a separate file, which can be loaded into any joystick for any profile.
- Supports 14 interface languages. The program consists of a single executable file and does not require installation.
- Autosave. Any changes are applied and saved immediately, so you can adjust settings without leaving the game.
Why this is better for playing simulators
Standard button remapping programs only change the response curve, i.e., the shape of the input. Joy Control also changes the speed: the number of milliseconds it takes for the signal to reach its target value at each point in the range. This represents a fundamentally different level of control, and it's precisely this that solves common problems with simulator games using a gamepad.
- The car doesn't break into a skid when you press the accelerator. The finger instantly pressed the trigger, and the power delivery increases smoothly, so the car accelerates as if you were gently pressing the pedal.
- The braking force is precisely controlled, right at the threshold of locking. The first 30% of the braking distance is rapid, with an immediate response, while the last 30% is slower. At the very end of the braking process, it's possible to reach the point where the wheels are about to lock up, something that is physically impossible to achieve manually.
- The release trigger is configured separately from the activation. This accelerator or brake pedal is not released at the same rate at which it is pressed. The smooth release of the brake when entering a turn, and the gentle easing off of the accelerator when climbing a hill, are each configured independently.
- The smooth operation does not hinder emergency procedures. Individual switches disable the delay in the extreme positions: as soon as the trigger is fully released, the brake is instantly disengaged.
- The steering wheel exhibits inertia. A sudden movement of the steering wheel doesn't result in an immediate turn of the wheels because the steering mechanism has its own built-in smoothing features for both steering input and return to the center position.
- Steering becomes more precise. Limiting the range on the X-axis reduces the full range of motion of the stick to 60-70% of the turning angle, and the same distance traveled by the finger now provides twice the precision.
- Everything works the same way in all games. The processing happens before the game starts, at the level of the virtual controller, so there's no need for any settings within the game itself, or for any mods.
- The left foot remains on the brake. Subtracting one trigger from another with a multiplier replicates the behavior of systems where the accelerator and brake conflict, or, conversely, allows for gentle braking without releasing the accelerator.
Accelerator and Brake Settings
The left trigger (L2 / LT) is the brake, and the right trigger (R2 / RT) is the accelerator. Each is configured in its own window, and all parameters are independent.
| Parameter | What it does: | How to Configure for a Simulator |
|---|---|---|
| Dead zone | A raw value below the threshold is considered zero. | On a new gamepad, the dead zone is typically set between 3 and 8 units. On a worn trigger that tends to "creep" forward, the dead zone should be increased to 10-15 units. |
| Minimum and maximum | "Min" is the entry threshold: below this value, the output is zero, and the remaining range is mapped to 0-255. "Max" limits the output from above. | "Min" settings (5-10) eliminate the rattling of a worn trigger without shortening the travel distance. For a rally car or a powerful rear-wheel-drive vehicle, the "Max" setting is set to 190-210 out of a possible 255, which effectively prevents full throttle. |
| Sensitivity curve | This setting defines the response curve within a range of -20 to +20. A negative value provides a smooth start and precision at the beginning of the travel, while a positive value provides a sharp transition to maximum output. | For the accelerator pedal, the curve level is typically set between -6 and -10, while for the brake pedal, it's set between -3 and -6. Positive values are rarely needed, for example, for a button-operated handbrake. |
| Touch areas | This feature allows you to define up to 10 segments within a range of 0 to 255, with each segment having its own delay in milliseconds per unit. Outside of these segments, the value changes instantly, while at the segment boundaries, the delays are added together. | As a guideline, 255 units at 1 millisecond each result in approximately 0.26 seconds for the entire travel. For the accelerator pedal, a setting of 0.3 to 2 milliseconds per unit is common, while for the brake pedal, a setting of 0.5 to 3 milliseconds is typical. |
| Release areas | This feature allows you to define a separate set of segments for the decreasing portion of the value. | Typically, the release time is faster than the press time: from 0.5 to 1 millisecond per unit. To achieve smooth brake release during cornering, the delay is increased at higher values. |
| Instant zero and instant maximum | This feature disables the smoothing effect when the trigger is fully released or fully pressed. | For the brake, it is enabled for emergency braking; for the accelerator, it is usually disabled. |
| Trigger subtraction and multiplier | The brake reduces the accelerator input, or vice versa, by a specified factor. | A multiplier from 0.5 to 1.0 replicates the braking action of the left foot and allows for throttle control. |
Pre-configured trigger settings:
| Preset | Action | Description | Purpose |
|---|---|---|---|
| Smooth braking | 0–80: 0,5 · 80–180: 1,5 · 180–255: 3,0 | 120–255: 1,0 · 0–120: 0,5 | Ring racing and fine-tuning near the lock-up threshold. |
| Smooth gas | 0–60: 0,3 · 60–200: 1,0 · 200–255: 2,0 | 0–255: 0,8 | Rear-wheel drive and cornering without wheelspin. |
| How ABS works | 0–128: 0,2 · 128–255: 2,5 | Instantly | Quick braking initiation and gradual pressure increase. |
| How are you | 0–128: 2,5 · 128–255: 0,2 | Instantly | Slow power delivery at the start and a wide, unrestricted upper range. |
The numbers in the table represent the delay in milliseconds for each output unit. The preset serves as a starting point: from there, adjustments are made for specific vehicles, and the results are observed on an oscilloscope, where the gray line represents the input, and the colored line represents the output received by the game.
Joystick Configuration
In racing simulators, the left joystick functions as the steering wheel, while the right joystick controls the view or camera. Each joystick allows for configuration of geometry (dead zones, range, and curve), as well as smoothness across different sections, independently for the X and Y axes.
| Parameter | What it does: | How to Configure for a Simulator |
|---|---|---|
| Internal dead zone | Eliminates drift in the center. | From 3% to 6% for a new joystick, and from 8% to 12% for a worn joystick. The lower the value, the more precisely the vehicle maintains a straight line. |
| Outer dead zone | Cuts off the extreme end, so the maximum value is reached slightly before the physical limit. | From 92% to 97%: This ensures a full rotation is achieved across the entire range, including diagonals. |
| Maximum range along the axes | Limits the output angle along the X or Y axis. | This is the primary setting for steering: from 60% to 75% along the X axis. The steering wheel stops turning fully, and precision increases significantly. |
| Full range of motion | After trimming the edges, it stretches the signal back to its maximum. | These are activated when a full range of motion is needed with a large dead zone. |
| Sensitivity along the axes | This sets the curve from -10 to +10. A negative value stretches the center and creates a smoother response, while a positive value makes the reaction more abrupt. | For steering, the curve level along the X axis should be set between -4 and -7. For camera control with the right stick, a setting between +2 and +4 is recommended for quick head rotation. |
| Deviation areas | These settings control the smooth transition away from the center. The amplitude ranges from 0 to 255, representing the full range of motion from the center, and each segment has its own flags for the X and Y axes. | For steering, a delay setting of 0-60 is suitable: 0.4 milliseconds for 0-60, 1.2 milliseconds for 60-160, and 2.5 milliseconds for 160-255 per unit. The stick responds quickly near the center but becomes sluggish at the extremes. |
| Return areas | It provides a smooth return to center. | From 0.5 to 0.8 milliseconds per unit across the entire range, this simulates the self-centering of the wheels. For the camera, the return is faster than the deviation. |
| Maximum value along the axis | For any deviation along the axis, it outputs the maximum value within the range. | Suitable for arcade steering and games that require digital rotation. |
| Complete disconnection of the joystick | The stick is not transmitted to the game, but its macros continue to function. | It's convenient when the steering wheel is used for steering, and the stick is only needed as a source of macros. |
The X and Y axes can be configured together or separately: each section has "X" and "Y" flags, and overlapping sections add the delays. An oscilloscope with a scale from -255 to +255 is available next to the settings, allowing you to see how much the output lags behind your finger movement.
Requirements:
- Windows 10 or 11 (x64 architecture).
- ViGEmBus driver version 1.22.0. The program checks for its presence and offers a one-click installation.
- The controller can be connected via cable, adapter, or Bluetooth.
The program runs in trial mode for 20 minutes per session. Full functionality is unlocked with a perpetual engi.live license.
Illustrated guide: where to click what
Below is a step-by-step description of all program windows with screenshots. This guide can also be downloaded as a PDF – the button is located at the top of the page.
1. Drivers: ViGEmBus and HidHide
- ViGEmBus is a virtual gamepad driver. Without it, the program will not create an Xbox controller. In the status bar at the bottom of the window, it should display ViGEmBus driver: OK. If it doesn't, an "Install" button will appear there.
- HidHide is not a mandatory component. It is only needed if the game detects both a physical gamepad and a virtual one simultaneously, which can cause the character to appear twice. More details can be found in section 15.
2. Main Window
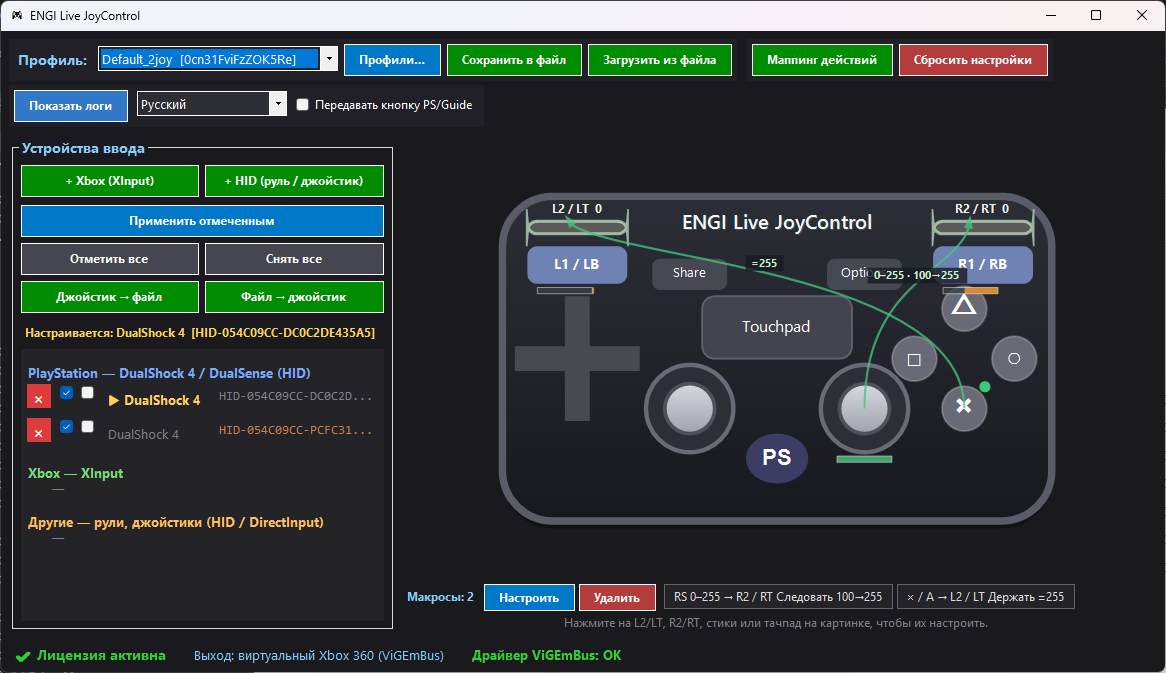
- The top panel includes options for selecting a profile, accessing the "Profiles..." menu, saving and loading entire profiles, managing action mappings, resetting to the default settings, and selecting the interface language.
- On the left are the input devices. This section displays all the configured joysticks, their IDs, checkboxes, and options for group operations.
- On the right is a diagram. It shows, in real-time, what data the game is receiving from the selected controller. You can click on the diagram: clicking on a trigger, stick, or button will open its corresponding settings.
- Below the image are the macros for the selected joystick: each icon represents a rule, and clicking on it reveals its source.
3. Multiple Joysticks and their IDs
The program supports any number of joysticks. Each joystick is assigned a unique ID: for Bluetooth controllers, this is their MAC address, so even two identical DualShock controllers will be recognized as distinct. Using this ID, the program automatically finds the joystick's settings upon connection, even if it's plugged into a different USB port.
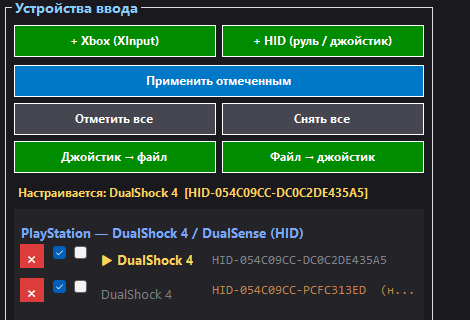
| List item | What it does: |
|---|---|
| × | Removes the joystick from the profile along with its settings. |
| First checkbox | Functionality: A virtual Xbox controller is created for the joystick. |
| Second checkbox | Selected: Participates in group operations. |
| Name | Click: configure this joystick. Double-click: rename. |
| ID | Click: copy the ID to the clipboard. |
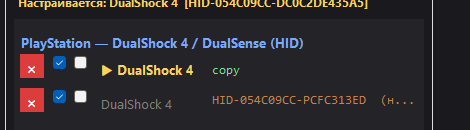
Batch operations
- Apply to selected — Copies all settings from the selected (▶) joystick to the joysticks that have the "selected" checkbox enabled.
- Select all / Clear all — Quickly set or clear all checkboxes.
- Joystick → file - Save the settings of a specific single joystick to a separate file with the extension .joy.json.
- File → Joystick — Loads settings from a file, applying them only to the selected joystick. If other joysticks are selected, the program will ask if you want to apply the settings to all of them. This option also works with standard profile files: if the file contains settings for multiple joysticks, the program will prompt you to choose which joystick's settings to use.
4. Profiles and Files
A profile is a complete set: all the joysticks and the settings for each. You can have as many profiles as you like, for example, for different games.
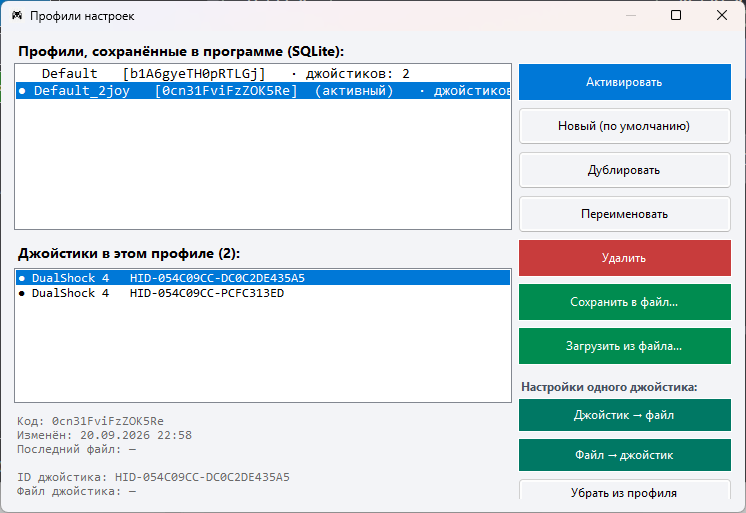
- Activate, New, Duplicate, Rename, Delete — actions related to profiles.
- Save to file… / Load from file… — Saves/loads the entire profile.
- The "One joystick's settings" block allows you to save or load a specific joystick's configuration file into any profile, even an inactive one, and to remove it from the profile.
- ●: The joystick has its own settings. ○: The joystick has not been configured and is using the default settings of the profile.
5. L2 / R2 Triggers
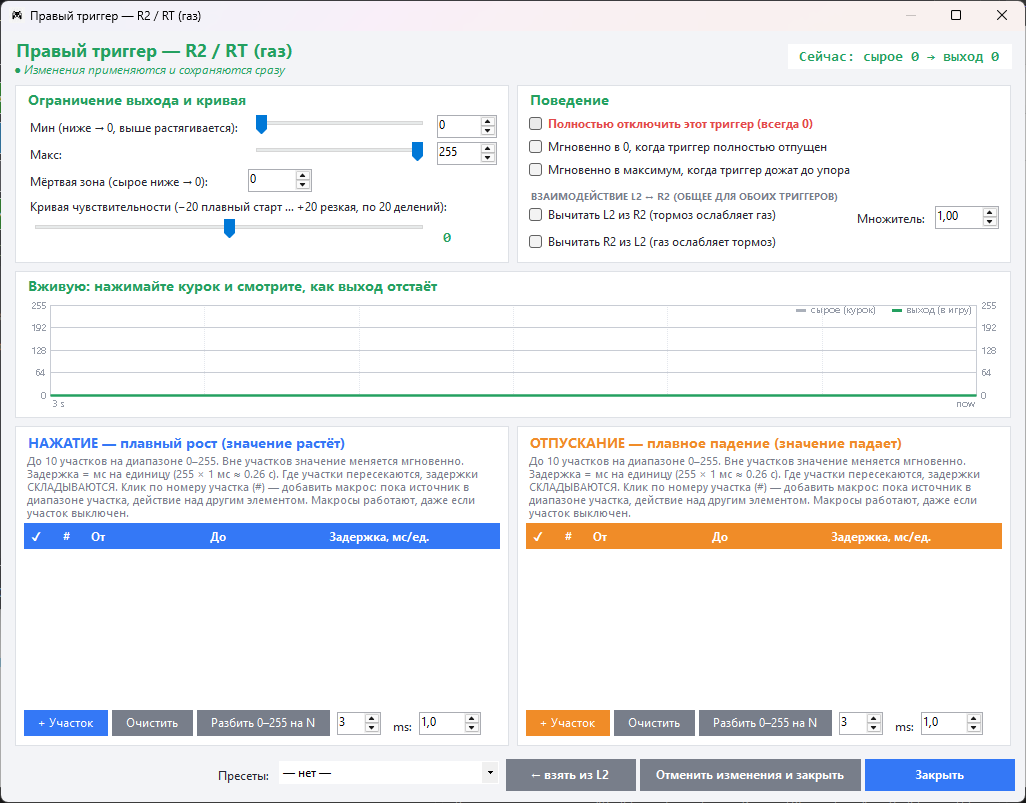
| Configuration | How it works |
|---|---|
| Min | Input Threshold: Anything below this value is treated as zero, and the remaining range is stretched across the full 0-255 scale. Example: Setting Min = 10 eliminates noise, but the trigger still provides full throttle. |
| Max | Output Limit: The game will never receive a value higher than this. |
| Dead zone | Raw values below the threshold are converted to 0 without scaling. |
| Curve | -20: Provides a smooth start and precise control at the beginning of the trigger's movement. +20: Provides a more responsive and immediate reaction. |
| Instantly to 0 / to the maximum | The trigger, when fully released or fully pressed, activates without delay. |
| Subtract L2 from R2 | For racing: the brake reduces the throttle, and the multiplier determines the force. There is also a reverse option. |
| PRESS / RELEASE | Smoothing Segments: In the selected portion of the trigger's range, the value increases or decreases not instantaneously, but with a delay of milliseconds per unit. Up to 10 segments can be used, and overlapping segments are combined. |
6. Sticks and Drift
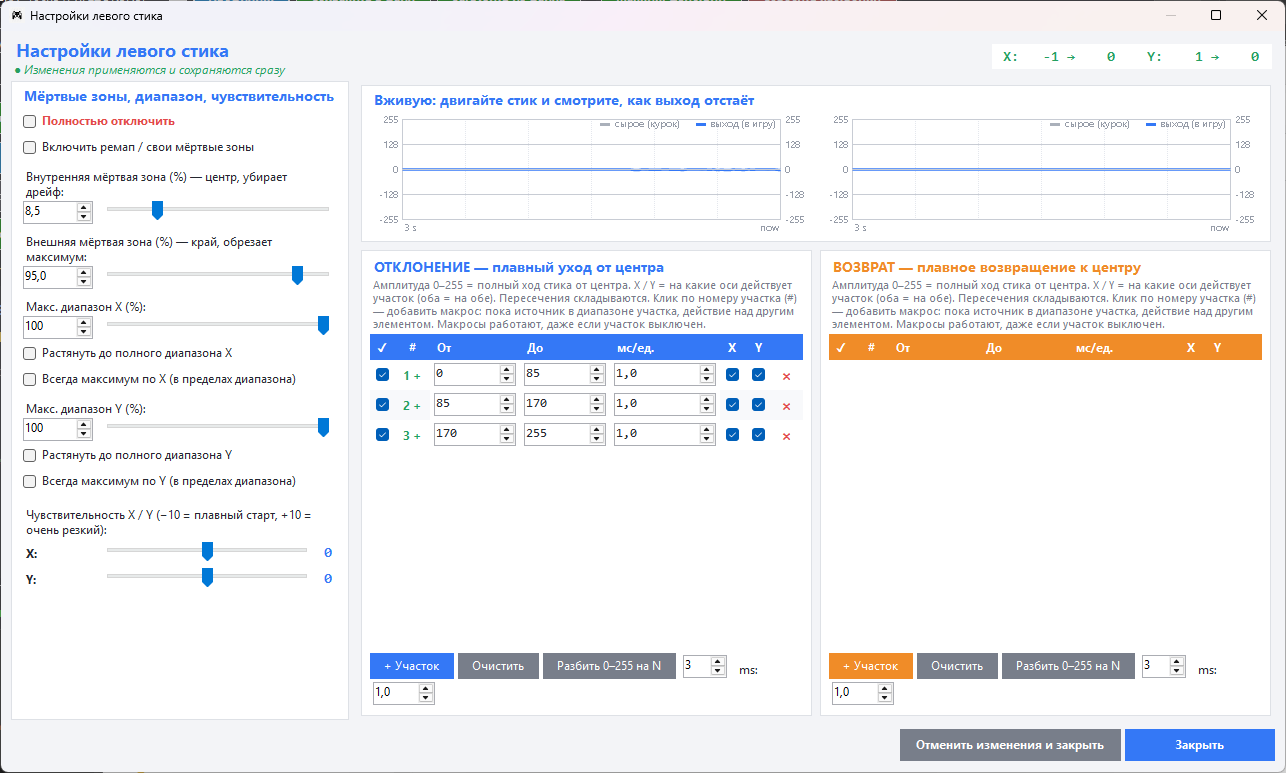
- Enable remap / custom deadzones - This is the main checkbox. Without it, the dead zone settings will not be applied.
- Inner dead zone – This setting eliminates stick drift in the center position. It is typically set between 8% and 15%.
- Outer dead zone – the extreme end of the stroke path, where the stick is considered to be fully extended.
- Max. X/Y range, Stretch, Always maximum - used to limit or expand the movement range along each axis.
- X/Y Sensitivity - response curve.
- OFFSET / RETURN — Smoothing segments, similar to those found in triggers; each segment has X and Y checkmarks indicating which axes it affects.
7. Macros: The Basics
A macro is a rule that states: "If source is in a certain state, then perform action on another element." The source can be:
- Trigger condition or trigger – the macro executes as long as the value within its specified range meets the condition.
- Button — The macro runs as long as the button is pressed (section 11).
Macro for a trigger or switch
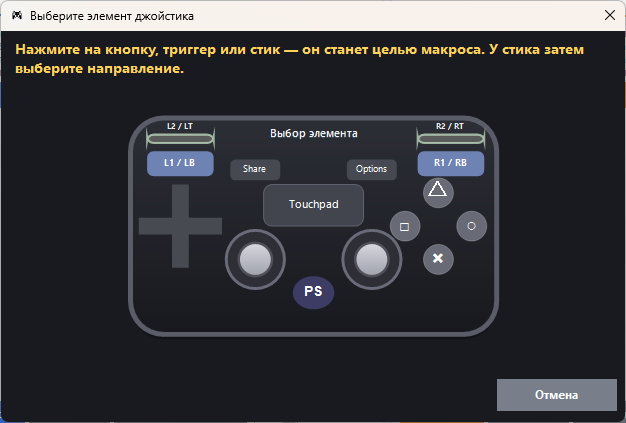
- Open the stick or trigger window and create a region.
- Click on the plot number – 1 +.
- An image will appear showing the target. Click on the target: this could be a button, a trigger, or a joystick. If it's a joystick, then select the direction.
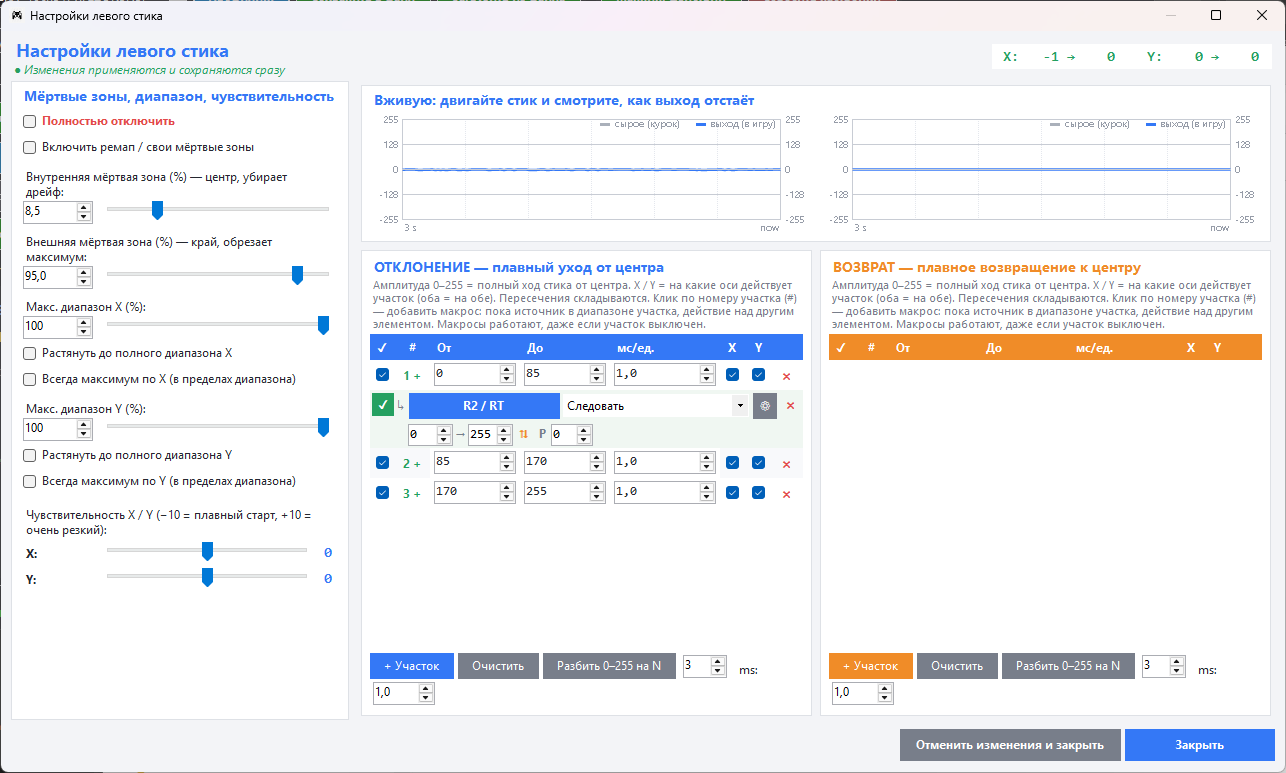
All rule parameters
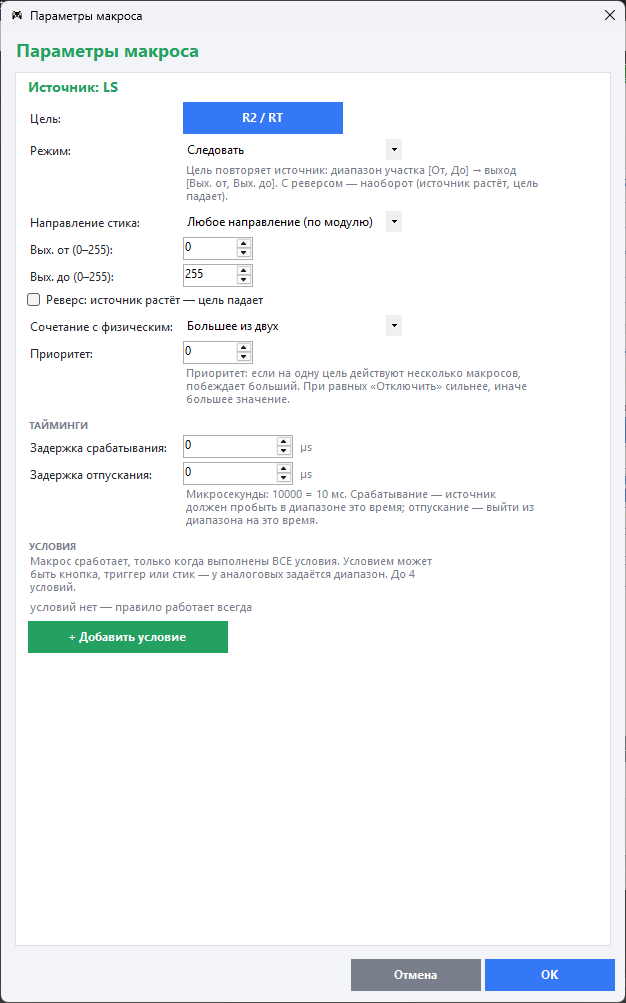
| Parameter | Meaning |
|---|---|
| Goal | Which element is the macro acting upon? |
| Mode | What exactly happens with the target – Section 8. |
| Stick direction | For the stick source: any, but only up/right or only down/left. |
| Output from / to | What values are assigned to the target. Reverse — the source is increasing, the target is decreasing. |
| Combine with physical | Larger of the two; Replace physical; Add – this adds to the value you are physically pressing, and to other macros, with the same priority and the same "Add" mode. |
| Priority | If multiple macros are acting on the same target, the macro with the higher priority wins. In case of a tie, "Disable" overrides all others. |
| Delays | Activation and release times in microseconds: 10,000 = 10 milliseconds. Activation means the source must remain within the specified range for that duration. |
8. Macro Modes
| Mode | What it does: | Example |
|---|---|---|
| Follow | The target replicates the source: its range is recalculated into the target's output range. This only applies to stick or trigger sources. | The stick smoothly presses the accelerator. |
| Hold | While the source is active, the target is pressed with the value "Output Delay." | L1 holds L2 down. |
| Impulse | When entering a range, the target is pressed once for a specified duration. | A short press triggers an action when the stick is moved rapidly. |
| Switch | Each input toggles the target on or off. | One press crouches, another press stands up. |
| Turbo | While the source is active, the target is pressed and released with a specified period. | Auto-fire. |
| Disable | The target is locked, even if physically pressed. This also applies to the entire stick. | Disable the stick while L2 is held down. |
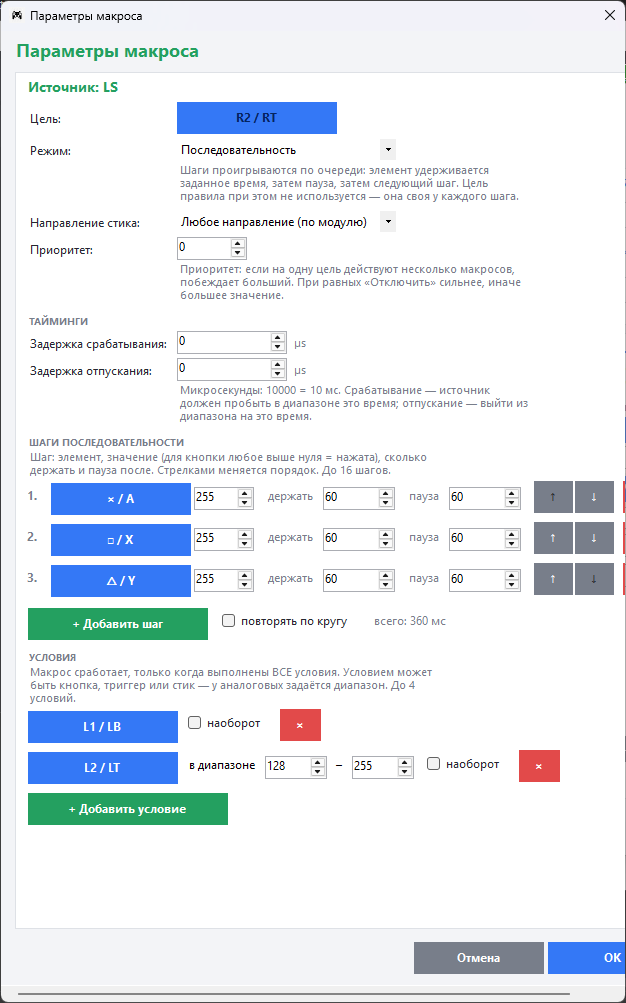
| Sequence | Sequence of actions: element, value, duration, pause – section 10. | A combo attack with a single button. |
9. Combinations: conditions
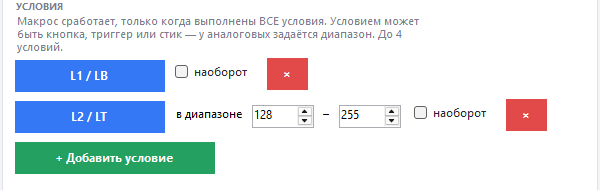
The conditions address the question of "what to do when two or more elements are selected." The macro will only execute if all the conditions are met. A condition can be:
- button - it is pressed;
- Trigger or stick — its value falls within a certain range, for example, "L2 button pressed more than halfway: 128–255".
- Any of them with a checkmark indicating the opposite means that the button is not pressed or the value is outside the specified range.
One rule: up to four conditions.
10. Sequences
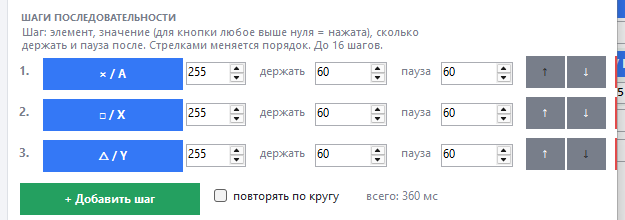
A single trigger initiates a sequence of actions performed over time. Each step includes: an element, a value (for a button, any value greater than zero indicates it's pressed), the duration, and a pause. Up to 16 steps can be defined. The loop checkbox enables the sequence to repeat as long as the source and conditions remain active.
11. Button macros
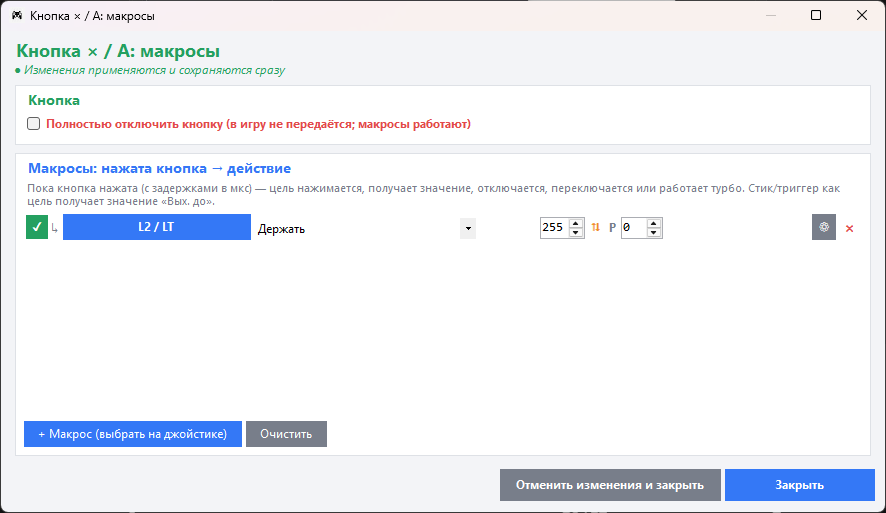
- + Macro (select on controller) - Add a rule and choose a target.
- Completely disable the button — The button is not assigned to any in-game function, but its macros continue to operate. This allows you to completely reassign the button.
- All modes, conditions, and sequences work the same way as with the sticks and triggers.
12. All macros and linking
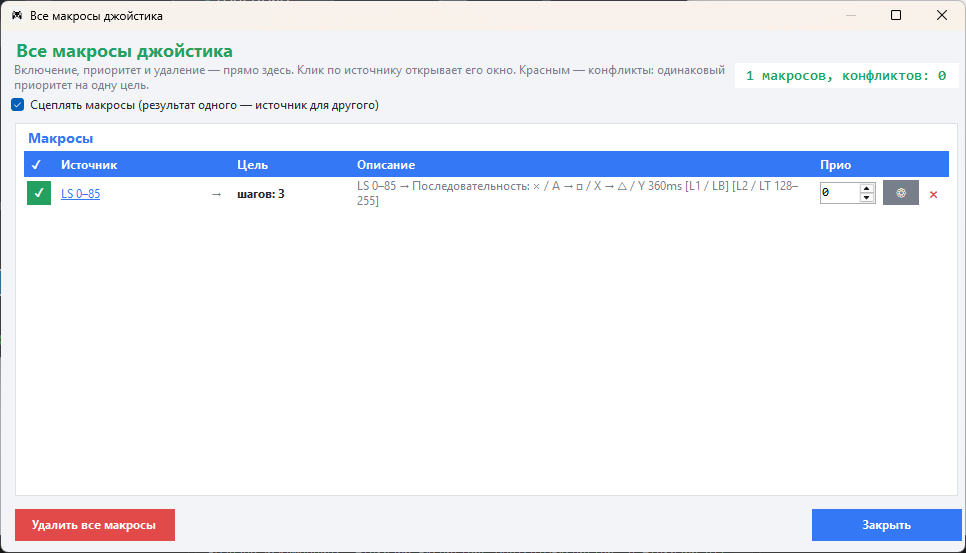
- Enable, priority, ⚙, and × are directly in the table. Clicking on the source opens its window.
- Conflicts are highlighted in red: This indicates situations where two macros are targeting the same object with the same priority, and it is unclear which one will take precedence.
- Delete all macros — start with a clean slate.
- Link Macros: The result of one rule becomes the source for another. For example, "× → L2" and "L2 within range → R1" will work as a chain triggered by a single press of ×. By default, this feature is disabled, so existing profiles function as they did before. The depth is limited to three levels to prevent infinite loops.
The macros are displayed as shown in the image
- The green lines indicate the path from the source to the destination. The sequence of lines leads to each element, and the labels #1, #2, and #3 represent the step numbers.
- Stripes below the element — Scale from 0 to 255: The green stripe near the source indicates the activation range, while the orange stripe near the target indicates the output range.
- Green dot - This element contains macros.
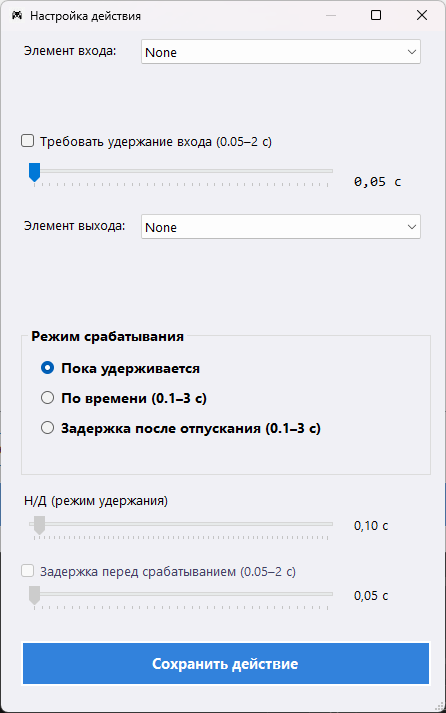
13. Action mappings
Simple remapping of "input → output" with a trigger threshold, hold duration, and timing – common to the profile.
14. Pre-made recipes
Eliminate stick drift
Stick → Enable remapping / custom dead zones → Internal dead zone: 10-12%. Check using the live graph: when at rest, the output line should be at zero.Eliminate trigger jitter without losing the full range of motion
Trigger → Min = 5-10. Any value below this will be set to zero, and the remaining range will extend up to 255.Smooth acceleration for racing games
R2 → Split the range 0-255 into N = 3 segments within the "PRESS" block, with a delay of 1-3 ms per segment in the initial section. Use a curve of -5 to -10 for precise start of movement. Optionally, subtract L2 from R2.Two-button combination: L1 + × → R2
Press the "X" button, then "+", then "Macro", and select "R2" as the target. Set the mode to "Hold". Then, go to the settings (⚙) and set the condition to "L1". Without pressing "L1", the "X" button will function normally.One button triggers a series of actions
Button → Macro → ⚙ → Mode: Sequence → Steps: × → □ → △, with a duration of 60/60 milliseconds. For a continuous sequence, select loop.Auto-fire
Pressing the R1 button triggers a macro that sets the target to R2, then activates Turbo mode with a duration of 80-120 milliseconds.Two players using two controllers
Connect both devices – each will appear in the list with its ID. Configure the first one, check the box next to the second one to select it, and then click "Apply to selected." After that, each device can be configured individually.Transfer settings to a new controller
Old joystick → Joystick → file. New joystick — click on the name → File → joystick.15. Troubleshooting: If something isn't working
| Symptom | Cause and solution |
|---|---|
| Edits are not working | Most likely, a disabled joystick is being configured – the "Configuring" line is orange. Click on the name of the connected joystick. |
| The trigger is firing on its own | Check the macros assigned to this trigger on the joystick: joystick drift may be activating the macro. You need to adjust the joystick's dead zone (section 6) or set the source range for the macro to 10. |
| The character "duplicates" in the game | The game recognizes both real and virtual controllers. To configure this, install HidHide: go to the Applications tab, click the "+", and add "JoyControl.exe"; then go to the Devices tab and check the box next to "Wireless Controller"; finally, reconnect the gamepad. The order is important: first, add the program to the whitelist, then enable the hiding feature. |
| The game does not detect the gamepad | Please check the ViGEmBus driver: OK status and ensure that the first checkbox indicating "working" is selected for the joystick. |
| The fifth joystick is not visible in the game | Windows limitation: XInput only allows games to recognize a maximum of four gamepads. |
| The second DualShock is not connecting via Bluetooth | Delete any old "Wireless Controller" entries in the Bluetooth settings. Reset the controller using a paperclip (there's a hole on the back near the L2 button) and put it into pairing mode by holding down the Share + PS buttons until the light flashes rapidly. Alternatively, simply connect it with a cable. |